Managing included metadata
OrgFlow deals only with Salesforce metadata that you have chosen to include in the metadata change flow.
Metadata that is included is tracked by OrgFlow's automatic change detection, stored and versioned in your Git repository, flowed between your Salesforce orgs in your Git branches, and flowed between the environments in your stack. Metadata that is not included is effectively ignored by OrgFlow and kept out of your Git repository and your metadata change flow. It is as if OrgFlow cannot see this metadata in your Salesforce orgs.
Every stack has a configurable set of filtering rules that dictate which subset of your Salesforce metadata should be included in the metadata change flow. These filtering rules are known as include specs. Metadata components matching the include specs constitute included metadata, all other metadata components constitute excluded metadata.
These filtering rules (include specs) are stored in a file named .orgflowinclude in the root of the Git repository. This file is known as the include file of your stack. The include file is versioned, branched and merged alongside your Salesforce metadata. Therefore, while the included metadata settings cover the whole stack, they can temporarily diverge between environments in the stack and ultimately converge as branches are merged — just like the included metadata itself.
See the include specs reference for detailed information about the syntax and semantics of include specs and include files.
Choosing what to include
When you initialize a new stack, OrgFlow suggests a default include file designed to cover the Salesforce metadata types most commonly customized in sandboxes and deployed across environments. You can accept the default suggestion, or change it — either during stack initialization or later on for an existing stack.
Choosing which metadata to include is a balance between several factors:
- The more metadata you include, the longer it takes to complete flow operations such as retrieving, merging and deploying metadata, and the higher the risk of merge conflicts and deployment issues caused by metadata changes you don't actually care about.
- The less metadata you include, the higher the risk that included changes fail to deploy across environments because they depend on changes that are not included.
- The less metadata you include, the more likely you will need to modify in a sandbox some component that wasn't included when the sandbox was created (more on this below).
- Some metadata types are normally created by users rather than customized by admins/developers, and are managed like user data, and should therefore normally be excluded. Examples include reports and dashboards.
- Some metadata types cannot be modified in production and should therefore normally be included. Examples include Apex, Visualforce and Lightning Aura metadata.
Keeping the above considerations in mind, decide carefully which metadata you include in the change flow when creating a stack. You should also continuously reassess as you iterate over your releases, and review the include file at regular intervals to ensure it still aligns with your Salesforce DevOps objectives.
Opt-in vs. opt-out
Your include file can be structured using an opt-in or opt-out approach.
With the opt-in approach, you start with an empty include file (which includes nothing) and explicitly add inclusions for any metadata you want to include in the flow:
# Include only layouts and quick actions:
unpackaged/~/Layout
unpackaged/~/QuickAction
This is the approach used by the default include file, and has the following benefits:
- Keeps metadata scope tighter, and retrieve and deploy operations consequently quicker
- Minimizes risk of merge conflicts and deployment failures
- Reduces instability over time, because new types of metadata introduced by Salesforce major releases are not automatically included in the change flow
With the opt-out approach, you start your include file with a line that includes all unpackaged metadata and explicitly add exclusions for any metadata you DO NOT want to include in the flow:
# Include all unpackaged and non-namespaced metadata:
unpackaged/~

# Exclude reports, dashboards, profiles and permission sets:
!unpackaged/~/Report
!unpackaged/~/Dashboard
!unpackaged/~/Profile
!unpackaged/~/PermissionSet
This approach has the following benefits:
- Minimizes risk of having to change included metadata for already existing sandboxes and deal with the resulting potential clobber
- Automatically covers new types of metadata introduced by Salesforce major releases
Which approach you choose is up to you, and ultimately depends on which benefits are more important to you. You don't have to pick one approach and stick with it forever; you can change from one approach to the other at any time, so long as you keep in mind the considerations described below.
Changing included metadata in an existing stack
A stack is typically a long-lived entity (often more or less permanent) and it can be difficult to predict when you create the stack which metadata your team will want to flow in the future — especially since new metadata types are continuously added to the platform.
Fortunately, you can make changes to the include file in an existing stack to add or remove included metadata over time. The steps for changing the included metadata in a stack are:
- Make the necessary changes to the include file in the production branch (usually
mainormaster) - Flow in the production environment to have the metadata added/removed in your Git repository
- Flow merge from production into sandbox environments (if any)
Considerations for existing metadata
Depending on the current environments in the stack and the metadata you intend to add or remove to the include file, there are some important considerations that you need to be aware of. These are illustrated in the following diagram, and explained in more detail below.
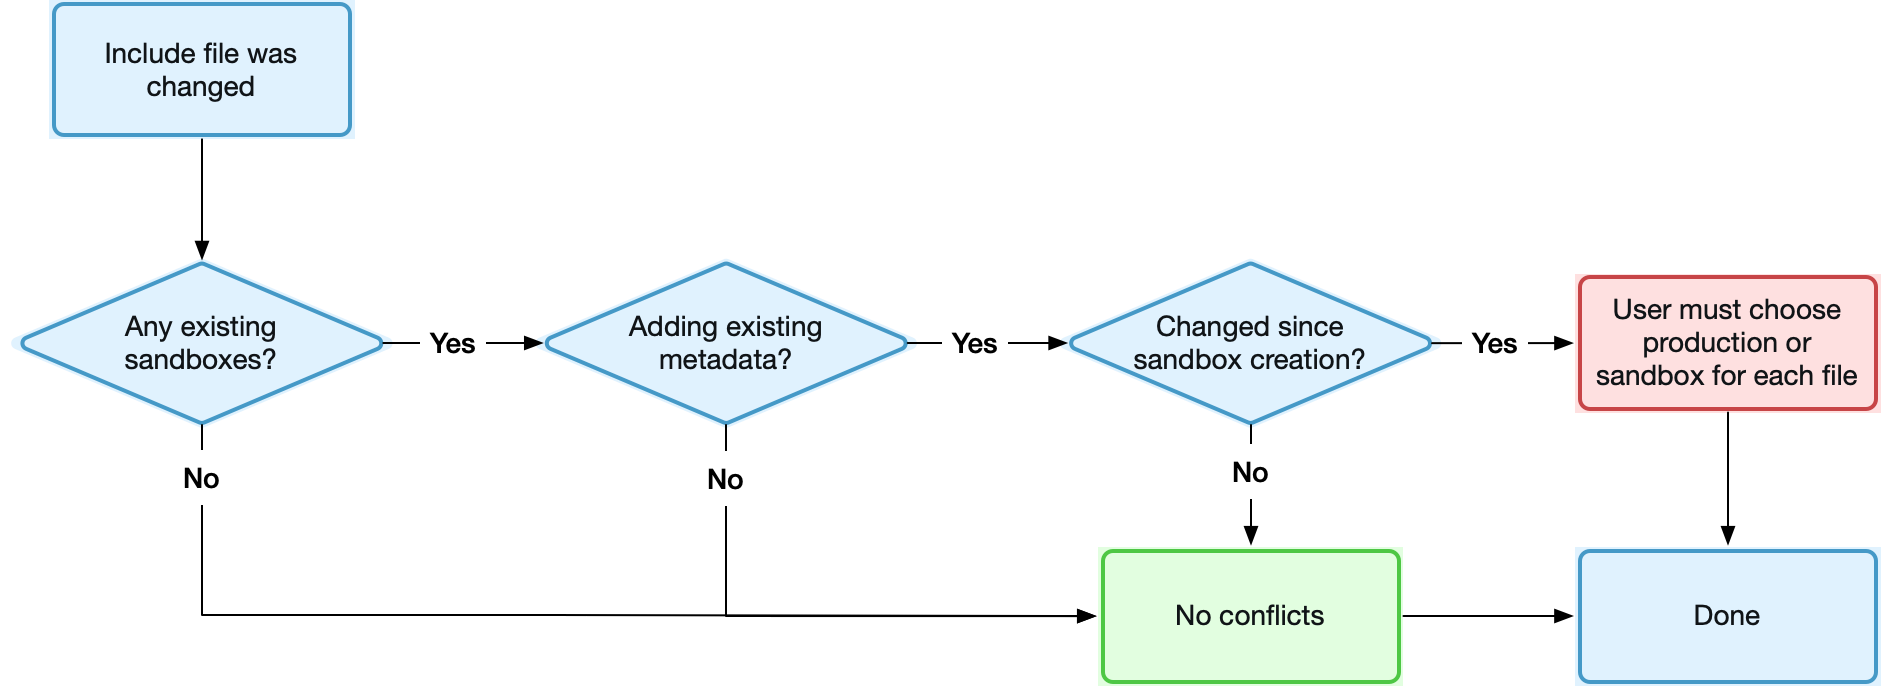
Are there currently any sandboxes in your stack?
If your stack currently contains only your production org (i.e. no sandbox environments) then you can freely change the included metadata in any way you like. The added/removed metadata will simply be reflected in the production branch (typically main or master) after the next flow in, and copied to any future sandboxes.
Are you adding any existing metadata to the flow?
OrgFlow's metadata change flow relies heavily on Git version control in order to achieve its magic features, such as safely merging changes from multiple sources and automatic conflict detection and resolution. To work its magic when changes to the same component are made in more than one place, Git requires the two modified versions to share a common ancestor in version history.
For OrgFlow to safely flow modifications of a given component between two environments, the component must exist with identical content in both Git branches before those modifications are made. Or expressed more technically, the two branches must both contain a shared commit at which the component was identical across the two environments — that's the common ancestor commit.
When you modify your include file so that it now includes metadata components which already exist in both your production org and sandboxes but which were not previously included in the flow, those components are added in each Git branch separately. The production branch is then merged into each sandbox branch (following the steps described above).
Has the existing metadata been changed on either side?
Components that are identical between production and each sandbox are simply accepted, and a common ancestor is established. However, components that are different between production and the sandbox obviously indicate that the component was changed (either in production, or in the sandbox, or both) since the sandbox was created. Such components will yield merge conflicts.
Because there is not yet a common ancestor at this point, Git cannot determine what changed where — only that the two versions differ. Therefore, OrgFlow will not be able resolve this merge conflict automatically, or even offer a three-way compare or merge. Instead you must resolve these merge conflicts by accepting either production or the sandbox version of each component as a whole. The differences between production and sandbox can be visualized at the source line level, but without any indication of what changed where.
This means there is a high risk of clobber, and you need to exercise a more caution. OrgFlow must essentially copy/paste (not merge) the new included metadata once, either from production to sandbox or the other way around, in order to establish the common ancestor commit we discussed above. This is simply an inherent constraint of Git's change flow, and is usually considered a small price for all the benefits that Git provides.
Once you have resolved any conflicts, the chosen version of each component becomes the common ancestor, and future changes to the component can be tracked across — and merged safely between — all environments.
Editing the include file
Editing the include file in your repository can be done in many different ways with many different tools, and how you do it is ultimately a matter of personal preference.
If you are using a commercial Git provider like GitHub or Azure Repos, you can easily edit the file and commit the changes straight to the branch via their respective web interfaces. Another option is to clone the repository to your local computer and use desktop Git tools, the Git command-line interface, or an IDE with built-in Git tools such as Visual Studio Code to check out the correct branch, edit the .orgflowinclude file, commit your changes and push the commit back to the remote repository.
When making changes to the include file, refer to the include specs reference for detailed information about the syntax and semantics of include specs and include files.
Sandbox initialization
When you request to create a new sandbox, Salesforce copies existing metadata and configuration from the source org (normally your production org) into the new sandbox. If choose to create a Full or Partial Copy sandbox, all metadata is copied unmodified. However, if you choose to create a Developer or Developer Pro sandbox where available storage space is more constrained, some mutations are applied during the metadata copy process:
- Some categories of metadata items (e.g.
ContentAssetandDocument) are omitted from the copy process - Any metadata items that reference the omitted items are modified to remove those references
This results in a newly created sandbox whose metadata is not identical to your production org. The sandbox branch is identical to the production branch, but it does not match the sandbox itself. In a version controlled context this is not a good starting point; the sandbox environment needs a baseline where the metadata is identical between the newly created sandbox and the backing branch, so that OrgFlow can use this as the common ancestor for safely tracking and flowing changes.
When preparing a new sandbox environment, OrgFlow therefore attempts to initialize the newly created sandbox and revert the mutations applied by Salesforce during the copy process, in order to establish a starting point where there is full parity between production and the new sandbox, and between the sandbox and the branch.
Including ContentAsset metadata
It can be necessary to include a subset of ContentAsset metadata in the flow because ContentAsset items are often referenced by other metadata such as CustomApplication and CustomTab. Because the ContentAsset items in a production org can amount to storage space much larger than what a normal Developer or Developer Pro sandbox allows, Salesforce omits ContentAsset metadata from the sandbox copy process, and automatically removes references to them from other metadata.
For the same reason, the default include file also does not include any ContentAsset metadata. If all ContentAsset items were included by default, the initialization described above might fail because the attempted deployment would exceed the sandbox storage limits.
On the other hand, if we include for example one or more CustomApplication or CustomTab components that reference ContentAsset items, but we don't include the referenced ContentAsset items themselves, then the initialization will likely fail for those components, because the ContentAsset items they reference don't exist in the sandbox. This means that OrgFlow cannot establish initial parity for those components, and change flow must therefore be disabled for those components for the lifetime of the sandbox.
OrgFlow is not currently able to determine which ContentAsset items are referenced by other included metadata and therefore must be included in the flow. Instead, we recommend that that you standardize on a naming pattern for ContentAsset items that allows you to easily identify and include only those ContentAsset items that are referenced by other metadata in the flow, while excluding other ContentAsset metadata that would risk exceeding the Developer or Developer Pro sandbox storage limits.
For example, whenever you add ContentAsset items that you reference from other metadata, you might prefix such ContentAsset items with FLOW_ and always name them accordingly. You could then add the following line to include only those content assets in the flow:
unpackaged/~/ContentAsset/FLOW_*This would allow OrgFlow to initialize new sandboxes with only this subset of ContentAsset items (which are unlikely to exceed the available sandbox storage space) which in turn also allows OrgFlow to initialize the metadata components (such as CustomApplication and CustomTab) where those ContentAsset items were referenced, thereby achieving full initial parity.
Excluding deleted Flow components
Starting with API version 44.0 it became more complicated to delete Flow components via the metadata API. In API versions 44.0 and greater, to delete a Flow component in a deployment, all versions of that flow in the target org must be deleted simultaneously in the same deployment. But since it's also no longer possible to retrieve a list of flow versions through the metadata API, OrgFlow is currently not able to delete Flow components.
It is recommended that, immediately after completing a production deployment containing deleted Flow components, you exclude the deleted flows from the change flow before merging upstream, in order avoid having older versions of those deleted Flow components "reappear" in upstream environments.
For example, let's say you have completed a flow merge to production, and the changes included deletions of two flows Alpha and Beta. The deployment of those two deleted flows fails, with the metadata API reporting the error message Insufficient access rights on cross-reference id, so you manually delete them from your production org as a post-deployment step.
You then add the following lines to the end of .orgflowinclude file in the production branch (typically main):
# Exclude deleted flows to prevent them from reappearing:
!unpackaged/~/Flow/Alpha
!unpackaged/~/Flow/Beta
After that, you run a flow in job with the force option enabled in order to clear out any deployment failures and "start over" with the metadata as it now looks in production, as the new established baseline. After that, you run a flow merge job to merge all new changes from your production environment into all upstream environments. The exclusions you added to the .orgflowinclude file are now merged into all upstream environments, which prevents older versions of these flows from reappearing in those environments as a result of OrgFlow's inability to delete them there.
If you later decide to repurpose the name of a previously deleted flow when creating a new flow, you will need to remove the corresponding exclusion line from your .orgflowinclude file.